Did you know that a simple chemical reaction between two clear liquids can transform into a rock-hard, glass-like masterpiece in just 24 hours? This fascinating process is the heart of modern crafting, allowing creators to preserve memories or design stunning home decor with ease. If you are curious about how to start resin art, you have arrived at the perfect destination.
Our beginner resin art guide simplifies the complex science behind this medium. By mastering the two-component system of liquid and hardener, you unlock endless creative possibilities. Whether you want to make jewelry or custom coasters, this resin art tutorial provides the essential knowledge to succeed safely.

We will walk you through the process, from gathering resin art supplies for beginners to perfecting your pouring style. You will learn vital resin art techniques and discover clever resin art tips and tricks to avoid common mistakes. Follow this resin art step-by-step approach to turn your vision into reality. Let’s dive into your first beginner resin projects today.
Key Takeaways
- Understand the chemical reaction between liquid and hardener.
- Prioritize safety by using proper ventilation and protective gear.
- Learn the importance of precise measuring for a perfect cure.
- Explore creative ways to color and embed items in your work.
- Master the basics of mixing to prevent bubbles and streaks.
Understanding the Basics of Resin Art for Beginners
Many people find that resin art for beginners is an incredibly rewarding and accessible hobby. At its heart, this craft involves a simple yet fascinating chemical process. You are essentially mixing two liquid components—a resin and a hardener—to create a durable, glass-like plastic finish.
When you learn how to start resin art, you quickly realize that the magic happens during the curing phase. Once these two parts combine, a chemical reaction occurs that transforms the liquid mixture into a solid state. This transformation is what allows artists to create everything from delicate jewelry pieces to large-scale home decor items.
The versatility of this medium is truly impressive. Whether you are interested in industrial applications like durable flooring or artistic projects like custom coasters, the fundamental principles remain the same. Mastering these basics provides a solid foundation for your creative journey.
“Creativity is intelligence having fun, and resin art offers the perfect canvas for that joy to take shape in a solid, permanent form.”
To help you understand the scope of this craft, consider the different ways you can apply these techniques. The following table outlines common projects and the typical finish expected for each.
| Project Type | Complexity Level | Primary Benefit |
|---|---|---|
| Jewelry Pendants | Low | High Detail |
| Decorative Coasters | Medium | Functional Art |
| Large Trays | High | Statement Piece |
If you are still wondering how to start resin art, remember that patience is your best tool. By grasping the chemistry behind the materials, you will feel much more confident as you begin your own projects. Engaging with resin art for beginners is a wonderful way to explore your artistic side while creating functional, beautiful objects for your home.
Essential Resin Art Supplies for Beginners
Before you pour your first drop of resin, you need to gather the essential supplies that make the process both safe and enjoyable. Following a reliable beginner resin art guide will help you avoid common mistakes while keeping your workspace organized. Having the right tools ready at your fingertips ensures that your creative flow remains uninterrupted.

Choosing the Right Epoxy Resin
The foundation of any project is the resin itself. You should look for a high-quality, two-part epoxy resin specifically formulated for art applications. These products typically come with clear instructions regarding mixing ratios, which are vital for achieving a perfect cure.
Selecting Mixing Cups and Stirring Tools
Precision is key when working with chemicals. Use graduated mixing cups to ensure you measure your resin and hardener accurately. Stirring sticks, such as silicone spatulas or wooden popsicle sticks, are necessary to blend the components thoroughly without introducing excessive air bubbles.
Surface Preparation and Substrates
Your choice of substrate will determine the final look of your piece. Beginners often start with silicone molds, which are excellent for creating jewelry or coasters. If you prefer working on flat surfaces, consider using primed wood panels or stretched canvas to provide a stable base for your pour.
| Supply Item | Primary Purpose | Key Benefit |
|---|---|---|
| Epoxy Resin | Main Medium | Provides durability |
| Silicone Molds | Shape Creation | Easy release |
| Mixing Cups | Measurement | Ensures accuracy |
| Stirring Sticks | Blending | Reduces bubbles |
Investing in quality resin art supplies for beginners will save you time and frustration in the long run. Always keep your tools clean and stored in a dry, cool place to maintain their longevity. With these basics in place, you are ready to start your first project with confidence.
Prioritizing Safety in Your Workspace
Creating beautiful art should never come at the expense of your health. While epoxy resin is a fantastic medium for beginners, it requires a disciplined approach to safety. By establishing clear habits early on, you can focus entirely on your creative process with complete peace of mind.
Ventilation and Respiratory Protection
Working with resin involves chemical components that release fumes during the mixing and curing stages. It is essential to work in a space with excellent airflow, such as a room with open windows or a dedicated exhaust fan. If your workspace lacks natural ventilation, consider using a high-quality air purifier to keep the air clean.
For your respiratory health, wearing a proper respirator is highly recommended. A mask equipped with organic vapor cartridges will filter out harmful particles and fumes effectively. Never rely on simple dust masks, as they do not provide the necessary protection against chemical vapors.
Skin and Eye Safety Protocols
Your skin and eyes are particularly sensitive to uncured resin. Always wear nitrile gloves to prevent direct contact, as resin can cause irritation or allergic reactions upon skin exposure. If you accidentally get resin on your skin, wash the area immediately with soap and water.
Eye protection is equally important to prevent accidental splashes during the mixing process. Safety goggles create a reliable barrier against stray droplets. Keeping a clean workspace helps minimize the risk of spills, but wearing protective gear ensures you are prepared for any unexpected accidents.
“Safety is not just a set of rules; it is the foundation upon which all great art is built. When you protect yourself, you gain the freedom to experiment without worry.”
Proper Disposal of Resin Waste
Responsible disposal is a key part of maintaining a safe studio environment. Never pour liquid resin down the drain, as it can harden and cause significant plumbing damage. Instead, allow any leftover resin to cure completely in your mixing cups before throwing it away in your regular trash.
Keep a dedicated container for resin-soaked paper towels and stir sticks. Once these items are fully cured, they are generally safe to dispose of according to your local waste regulations. Following these simple steps ensures that your artistic hobby remains environmentally conscious and safe for everyone in your home.
| Safety Gear | Purpose | Frequency |
|---|---|---|
| Nitrile Gloves | Skin Protection | Every Session |
| Safety Goggles | Eye Protection | During Mixing |
| Respirator | Fume Filtration | During Mixing/Pouring |
| Apron | Clothing Protection | Every Session |
Preparing Your Workspace for Success
A professional resin finish begins long before you mix your first batch of chemicals. Your environment plays a critical role in how your final piece turns out. For the best results, always work in a space that stays at a temperature of 70 degrees Fahrenheit or higher.
Cold temperatures can cause your resin to become thick, cloudy, or even fail to cure properly. By maintaining a warm and stable climate, you set the stage for a smooth, flawless application every single time.
Creating a Dust-Free Environment
One of the biggest challenges for beginners is keeping debris out of wet resin. Even a tiny speck of dust can ruin a perfectly clear pour. To prevent this, avoid working near open windows or high-traffic areas where dust might circulate.
You should also turn off any ceiling fans while you work. Once your project is poured, consider placing a plastic storage bin or a cardboard box over the piece to act as a protective shield while it cures. This simple trick keeps your art pristine and free from unwanted particles.

Leveling Your Work Surface
Resin is a self-leveling medium, which means it will naturally flow to the lowest point of your surface. If your table is even slightly tilted, your resin will pool on one side, leading to uneven thickness or overflow. Always use a spirit level to ensure your workspace is perfectly flat before you begin.
If you find that your table is not level, you can use small shims or folded pieces of cardboard under the legs to adjust it. Taking these few extra minutes to calibrate your surface will save you from frustration later. A level table is the secret weapon of every successful resin artist.
Protecting Your Table with Silicone Mats
Resin is notoriously sticky and can be difficult to remove from wood or plastic surfaces once it hardens. Using a protective barrier is essential for keeping your furniture in good condition. Silicone mats are a fantastic choice because they are durable, heat-resistant, and easy to clean.
When resin drips onto a silicone mat, you can simply wait for it to cure and then peel it right off. This makes cleanup a breeze and allows you to reuse your workspace protection indefinitely. Below is a quick comparison of common materials used to protect your crafting area.
| Material | Reusability | Ease of Cleaning | Durability |
|---|---|---|---|
| Silicone Mat | High | Excellent | High |
| Wax Paper | Low | Poor | Low |
| Plastic Sheeting | Medium | Fair | Medium |
Measuring and Mixing Resin Correctly
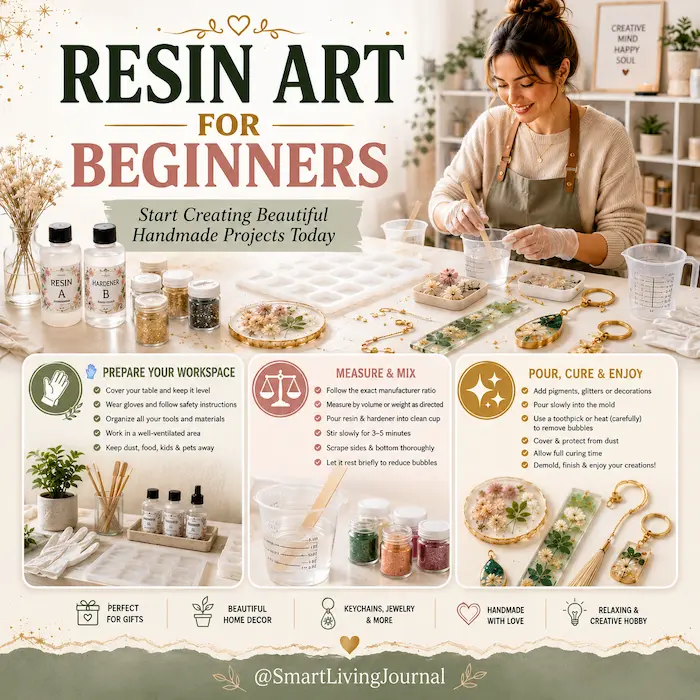
Precision is the secret ingredient that separates a hobbyist from a master resin artist. When you follow a resin art step-by-step process, you quickly learn that the chemical reaction between your resin and hardener is delicate. If your measurements are off, your project may remain sticky or fail to cure entirely.
Understanding Mixing Ratios
Most beginner-friendly epoxy resins require a simple 1:1 mixing ratio by volume. This means you must pour an equal amount of resin and hardener into your mixing cup to ensure the chemical bond forms correctly. Always double-check the manufacturer’s instructions, as some specialized formulas might require different proportions.
Using a graduated mixing cup is the best way to maintain accuracy. Take your time to read the markings at eye level to avoid any parallax errors. Even a small deviation in this ratio can lead to soft spots or a cloudy finish on your final piece.
The Importance of Thorough Stirring
Once you have measured your components, the mixing phase begins. You should stir your mixture slowly and consistently for at least 3 minutes. It is vital to scrape the sides and the bottom of your cup frequently during this time.
Unmixed resin clinging to the walls of your container will not cure properly. If you pour this unmixed material onto your substrate, you will end up with tacky, wet patches that are difficult to fix. Patience during this stage is your best friend for achieving a professional result.
Avoiding Common Bubbling Issues
Many beginners struggle with air bubbles trapped in their work. To minimize this, keep your stirring motion steady and avoid whipping the mixture like you would with cake batter. A slow, rhythmic motion helps keep the air out of your resin art tutorial project.
If you notice bubbles after mixing, let the cup sit for a minute or two before pouring. This allows the air to rise to the surface naturally. Proper technique during the mixing phase is the most effective way to ensure your finished art is crystal clear and free of unwanted defects.
Adding Color and Texture to Your Resin
Transforming clear resin into a vibrant masterpiece is one of the most rewarding parts of the creative process. Once you feel comfortable with your base mixture, you can begin experimenting with bold colors and unique textures to make your work stand out.
Choosing the right additives is essential for maintaining the structural integrity of your project. Always ensure that your chosen materials are compatible with epoxy resin to prevent curing issues.
Using Liquid Pigments and Dyes
Liquid pigments and dyes are excellent for achieving deep, saturated colors. Alcohol inks are a favorite among artists because they offer beautiful transparency, allowing light to pass through your finished piece.
You can also use small amounts of acrylic paint to tint your resin. Be careful, as adding too much paint can interfere with the chemical reaction and prevent the resin from hardening properly.

Incorporating Mica Powders for Shimmer
If you want to add a touch of luxury, mica powders are the perfect choice. These fine, metallic-like powders create a stunning, opaque shimmer that catches the light beautifully.
A little goes a long way with these powders. Start by adding a tiny amount to your resin and stir thoroughly until you reach your desired level of opacity.
“Creativity is intelligence having fun.”
Adding Glitter and Decorative Inclusions
To truly personalize your art, consider adding physical textures like glitter, dried flowers, or gold leaf. These elements add depth and character, turning a simple project into a unique work of art.
When working with organic materials like flowers, ensure they are completely dried to avoid trapping moisture. Trapped moisture can lead to cloudiness or decay within your cured resin.
| Additive Type | Effect | Best Use |
|---|---|---|
| Alcohol Ink | Transparent | Petri dish effects |
| Mica Powder | Metallic Shimmer | Solid color pours |
| Glitter | Sparkle/Texture | Decorative accents |
Always remember to test your additives on a small batch first. This simple step ensures your colors remain stable and your final result looks exactly as you imagined.
Pouring Techniques for Stunning Effects
Mastering professional pouring techniques is the secret to elevating your resin art from simple crafts to stunning masterpieces. By learning how to manipulate your medium, you can achieve complex results like ocean waves or geode-inspired textures. These resin art techniques provide the control needed to turn a blank substrate into a vibrant, professional-looking display.
The Dirty Pour Method
The dirty pour is a popular approach where you combine multiple colors into a single cup before pouring them onto your surface. Instead of mixing the colors completely, you gently layer them to maintain distinct swirls. This resin art step-by-step process allows the colors to interact naturally as they flow across the board.
“Art is not what you see, but what you make others see.”
Creating Cells and Lacing
You can create beautiful, organic patterns known as cells and lacing by manipulating the surface tension of your resin. After pouring, use a heat gun or a torch to gently warm the surface, which encourages the colors to pull apart and create intricate web-like structures. Always keep your heat source moving to avoid burning the resin or damaging your substrate.
This method requires patience and a steady hand to achieve the desired look. If you notice bubbles forming during this process, a quick pass with your torch will effectively pop them, leaving a smooth, glass-like finish.
Layering Techniques for Depth
Layering is an essential skill for artists who want to add a sense of three-dimensional depth to their work. By allowing one layer to reach a semi-cured state before adding the next, you can create floating effects or distinct color transitions. Following a resin art step-by-step approach ensures that each layer bonds correctly without trapping unwanted debris.
| Technique | Primary Goal | Best Tool |
|---|---|---|
| Dirty Pour | Color Swirling | Mixing Cup |
| Cell Creation | Lacing Effects | Heat Gun |
| Layering | Visual Depth | Leveling Table |
Experimenting with these methods will help you develop your own unique style. Remember that practice is the most important part of mastering these resin art techniques, so do not be afraid to try new color combinations and pouring speeds.
Managing Curing Times and Environmental Factors
Your resin project is not truly finished the moment you stop pouring. While you may have a working time of 20 to 30 minutes to manipulate your design, the chemical reaction continues long after you leave the room. Understanding this timeline is essential for managing your expectations and ensuring your art reaches its full potential.
Most standard epoxy resins require approximately 7 days to reach a full cure. During this period, the material transitions from a liquid state to a solid, durable finish. Being aware of this duration helps you plan your workspace and prevents you from handling pieces before they are ready.

The Role of Temperature and Humidity
Environmental conditions are the silent partners in your creative process. Resin is highly sensitive to its surroundings, and even small shifts in the room can alter the outcome. Ideally, you should maintain a consistent room temperature between 70°F and 75°F for the best results.
High humidity can be particularly problematic, often leading to a cloudy or sticky surface. If the air is too cold, the resin may take significantly longer to harden or remain soft indefinitely. Always monitor your environment to ensure your workspace remains stable throughout the entire curing cycle.
How to Tell When Resin is Fully Cured
It is important to distinguish between a piece that is safe to demold and one that is fully cured. Most projects can be removed from their molds after 24 hours, but the resin will still be somewhat flexible. You should handle these pieces with care to avoid leaving fingerprints or causing accidental warping.
To check if your piece is ready, gently press a fingernail into an inconspicuous area. If the surface feels firm and shows no indentation, it is likely well on its way to completion. However, if it feels soft or rubbery, it needs more time in a controlled, dust-free environment to reach its maximum strength.
Handling Tacky or Uncured Spots
Occasionally, you might discover small, tacky patches on your finished work. This often happens due to improper mixing or extreme fluctuations in temperature during the initial stages. If you encounter these spots, do not panic, as there are ways to address the issue.
You can often fix a sticky surface by applying a thin, fresh coat of properly mixed resin over the top. This seals the uncured area and provides a smooth, hard finish once it dries. Precision in your initial measurements remains the best way to prevent these issues from occurring in the first place.
Finishing Touches and Polishing
Transforming a raw resin casting into a smooth, professional-grade piece requires just a few simple final steps. While you can safely demold your projects after 24 hours, keep in mind that the material will continue to strengthen and harden over the next week. Taking your time during this final phase ensures your hard work results in a beautiful, high-quality finish.
Sanding Rough Edges
It is common for resin pieces to develop sharp or uneven edges after they are removed from a mold. You can easily fix these imperfections by using wet-dry sandpaper. Always start with a coarser grit, such as 400, and gradually move to a finer grit like 1000 or 2000 for a smooth feel.
Pro tip: Always sand your resin under a small stream of water or with a damp cloth to prevent harmful dust from becoming airborne. This simple habit keeps your workspace clean and protects your lungs from fine particles.
Applying a Top Coat for Extra Shine
Sometimes, the surface of a cured piece may appear dull or develop minor scratches during the handling process. Applying a thin, fresh layer of resin acts as a protective top coat that restores that signature glass-like shine. This technique effectively fills in tiny imperfections and gives your project a professional, gallery-ready appearance.
- Ensure the surface is completely clean and free of dust before pouring.
- Use a heat gun or torch briefly to pop any bubbles that appear in the top coat.
- Allow the piece to cure in a dust-free environment for another 24 hours.
Cleaning Your Tools for Reuse
Proper maintenance of your silicone tools is essential for long-term success in your craft. If you have leftover resin on your mixing cups or stirrers, you can often peel it off once it has fully cured. For sticky residue that remains, consider these effective cleaning methods:
Recommended Cleaning Steps:
- Wipe excess wet resin immediately with a paper towel.
- Use a small amount of isopropyl alcohol on a cloth to remove stubborn spots.
- Wash silicone molds with mild soap and warm water to keep them flexible and clear.
By keeping your equipment clean, you ensure that your future projects remain free of contamination. Taking care of your tools today saves you time and money on your next creative adventure.
Troubleshooting Common Resin Art Mistakes
Even the most skilled creators occasionally face unexpected hurdles when working with epoxy. Following a quality resin art tutorial can help you avoid many pitfalls, but sometimes environmental factors or minor errors still occur. Learning how to fix these issues is a valuable skill that will save your projects and boost your confidence.

Fixing Fish Eyes and Surface Defects
Fish eyes appear as small, circular craters where the resin has pulled away from the surface. This usually happens due to silicone contamination or a surface that was not properly cleaned. To fix this, allow the piece to cure completely before lightly sanding the affected area.
Once the surface is smooth, wipe away any dust with a clean cloth. Apply a thin seal coat of fresh resin to fill the craters and restore a uniform, glossy finish. This simple step often saves a piece that seemed ruined.
Dealing with Sticky Resin
If your project remains tacky after the recommended cure time, do not panic. This issue is often caused by improper mixing ratios or high humidity levels in your workspace. A reliable resin art tutorial emphasizes the importance of measuring by weight or volume with extreme precision.
If the resin is only slightly sticky, you can sometimes apply a fresh, correctly mixed layer over the top to lock it in. However, if the mixture is completely uncured, it is best to scrape it off and start fresh. Always ensure your room temperature stays within the manufacturer’s suggested range to prevent future curing problems.
Removing Dust and Debris
Dust particles are the most common enemy of a perfect finish. If you spot a piece of lint or debris while the resin is still wet, use a toothpick or a needle to gently lift it out. Be careful not to disturb the surrounding design too much.
If the resin has already hardened, you can sand the specific spot with fine-grit sandpaper. After sanding, apply a small drop of fresh resin to the area to regain that beautiful, glass-like shine. With these techniques, you can maintain a professional look in every project you create.
Exploring Beginner Resin Art Projects
Diving into the world of resin art for beginners allows you to transform simple materials into stunning, functional pieces. Starting with small, manageable tasks is the best way to build your confidence and refine your technical skills. By focusing on these accessible creations, you will quickly learn how to handle resin effectively before moving on to larger, more complex masterpieces.
Selecting the right beginner resin projects is essential for a positive experience. These initial efforts require minimal supplies and offer quick results, which helps keep your motivation high. Whether you want to make gifts for friends or unique decor for your home, these three project ideas are perfect starting points.
Creating Resin Jewelry Pendants
Jewelry making is a fantastic way to practice your pouring technique on a small scale. You can use silicone molds in various shapes to create custom pendants that reflect your personal style. Adding dried flowers, gold leaf, or tiny beads inside the resin creates a professional look with very little effort.
Designing Decorative Coasters
Coasters are arguably the most popular choice for those new to the craft. They are functional, easy to display, and provide a flat surface that is perfect for experimenting with color swirls and metallic pigments. You can create a matching set or design each one with a unique pattern to showcase your creativity.
Making Resin Art Trays
Once you feel comfortable with smaller items, moving up to a decorative tray is a natural next step. These trays allow you to work with a larger surface area, which is great for practicing your layering techniques. A finished tray serves as a beautiful centerpiece for your coffee table or a stylish organizer for your vanity.
To help you choose your first project, consider the following comparison of common starter items:
| Project Type | Difficulty Level | Estimated Curing Time | Material Usage |
|---|---|---|---|
| Jewelry Pendants | Easy | 12-24 Hours | Low |
| Decorative Coasters | Moderate | 24 Hours | Medium |
| Art Trays | Advanced Beginner | 24-48 Hours | High |
Completing these beginner resin projects will provide you with the foundational knowledge needed for future success. Remember to take your time with each pour and enjoy the process of watching your art come to life. With practice, you will soon be ready to tackle even more ambitious designs in your resin art for beginners journey.
Advanced Tips and Tricks for Better Results
Elevating your creative output requires a deeper understanding of professional tools and methods. By incorporating specific resin art techniques, you can refine your workflow and produce pieces that stand out for their clarity and precision.

Using Heat Guns and Torches Safely
Applying heat is a common way to remove stubborn bubbles, but it must be done with caution. Always keep your heat source moving to avoid scorching the surface or damaging your mold. Remember that most epoxy resin is only heat resistant up to 110° F, so never use hot plates or high-heat appliances on your finished work.
Here are some essential resin art tips and tricks for safe heating:
- Keep your torch or heat gun at least six inches away from the surface.
- Use a sweeping motion to distribute heat evenly across the piece.
- Never hold the flame in one spot for more than a second to prevent yellowing.
Working with Silicone Molds
Achieving crisp, clean edges starts with how you treat your molds. Before pouring, ensure your molds are completely free of dust or debris, as these will show up clearly in the final cure. Using high-quality resin art techniques, such as applying a light mold release spray, can significantly extend the life of your silicone tools.
When removing your cured piece, be gentle to avoid tearing the silicone. If you notice small imperfections on the edges, you can often trim them away with a sharp craft knife once the resin has fully hardened.
Achieving Professional-Grade Finishes
The final look of your project often depends on the effort you put into the finishing stage. A professional result usually involves sanding down any sharp edges and applying a thin, clear top coat to restore shine. These resin art tips and tricks will help you achieve a glass-like surface that looks store-bought.
“Consistency in your process is the secret to professional results in any creative medium.”
Always work in a well-lit area to spot any missed spots during your final top coat application. Taking your time during this last step ensures that your hard work is protected and looks its absolute best.
Maintaining Your Resin Art Equipment
When you learn how to start resin art, you quickly realize that equipment care is just as important as the pouring process itself. Consistent maintenance ensures your tools remain in top condition, which saves you money and prevents frustration during future projects. By following a few simple habits, you can extend the life of your gear significantly.
Cleaning Silicone Molds
Silicone molds are essential resin art supplies for beginners, but they require gentle handling to stay effective. After your piece has fully cured, gently flex the mold to release the resin. If any sticky residue remains, use a piece of clear packing tape to lift away dust or small debris.
Avoid using sharp tools or metal scrapers, as these can easily scratch or tear the delicate silicone surface. If you need to wash your molds, use warm water and mild dish soap. Always allow them to air dry completely before storing them away to prevent moisture buildup.
Storing Resin Properly
Chemical integrity is vital for achieving a perfect cure every time you work. Unopened resin typically has a shelf life of one year when kept in a cool, dark place. Once you open your bottles, you should aim to use the contents within six months to ensure the best results.
Always store your resin in a temperature-controlled environment, away from direct sunlight or extreme heat. Keep the caps tightly sealed to prevent moisture from entering the bottles. Proper storage prevents the resin from yellowing or becoming too thick to pour correctly.
Organizing Your Craft Supplies
Keeping your workspace tidy makes your creative process much smoother and more enjoyable. Group your mixing cups, stir sticks, and pigments in labeled bins so you can find them instantly. A well-organized station helps you focus on your design rather than searching for lost tools.
Consider using a dedicated cart or shelf for your resin art supplies for beginners to keep them separate from other household items. When you know exactly where everything is, you can start your next project with confidence. Remember that a clean studio is the hallmark of a professional artist who knows how to start resin art the right way.
Conclusion
Resin art offers a unique path for self-expression and creative growth. This beginner resin art guide provides the foundation you need to transform liquid materials into stunning works of art.
Keep your workspace organized and store your supplies in a room between 60 and 70 degrees. Proper storage ensures your epoxy remains in peak condition for every pour. You will find that consistent practice leads to better results over time.
Start your own beginner resin projects today to see your vision come to life. Experiment with different pigments and molds to discover your personal style. Every piece you create builds your confidence and skill set.
Stay curious as you explore new resin art tips and tricks. Share your creations with friends or join local craft communities to exchange ideas. Your artistic journey is just beginning, and the possibilities for your next project are endless.
FAQ
How do I start resin art for beginners without spending a lot of money?
What is the best resin art tutorial for learning the “dirty pour” technique?
Can I use a hair dryer instead of a heat gun for resin art techniques?
What are the most important resin art tips and tricks for avoiding bubbles?
Which resin art supplies for beginners are absolutely non-negotiable for safety?
How do I achieve a resin art step-by-step ocean wave effect?

SmartLivingJournal
Prabir Dutta is a passionate digital creator, affiliate marketer, and wellness enthusiast who simplifies complex topics like AI tools, Vastu, pet care, and modern living. With a keen eye for SEO, tech trends, and everyday health solutions, he writes to empower readers with actionable, smart-living insights. When not curating content across his network of niche blogs, Prabir enjoys exploring new digital tools that make life easier and more efficient.
Keep exploring Smart Living Journal
Discover more practical ideas on wellness, home living, plants, pets, routines, and smarter everyday upgrades.