
Why We Recommend It
Serplex Helix Resin Mixer Drill Attachment – 4-Piece Set
The Serplex Helix Resin Mixer Drill Attachment Set provides an affordable way to mix epoxy resin and other craft liquids with an existing drill.
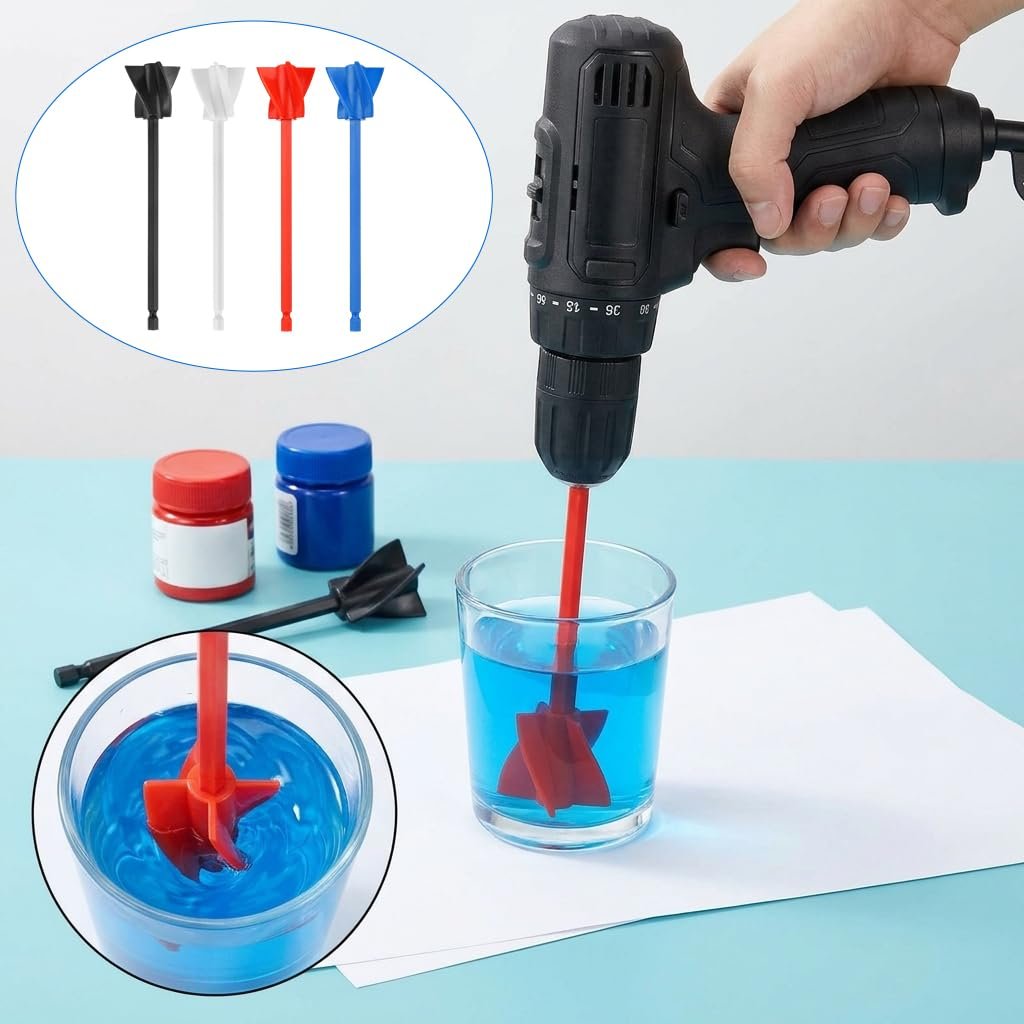
The package includes four lightweight mixing paddles in black, white, red and blue. Each attachment features a helix-style head that rotates through the liquid when connected to a compatible drill.
It is intended for materials such as:
- Epoxy resin and hardener
- Resin pigments and colourants
- Paint
- Ceramic glaze
- Silicone
- Stains
- Other relatively thin or moderately viscous liquids
The product is particularly relevant for resin artists who regularly prepare medium-sized batches for coasters, trays, decorative moulds and similar projects. The Amazon listing describes the set as suitable for fast and efficient mixing and compatible with most drills.
Unlike a dedicated electric resin mixer, this product does not contain a motor, battery or charging system. It must be attached securely to a compatible electric or cordless drill.
Its biggest advantage is value. Buyers who already own a variable-speed drill can avoid purchasing an expensive specialised resin mixer. However, the drill must be operated slowly because excessive speed can introduce air bubbles, cause splashing and accelerate heat buildup in the resin.
5. Key Features
Four Colour-Coded Mixer Attachments
The package contains four paddles in different colours. This can help users keep separate paddles for clear resin, dark pigments, bright colours, paint or other materials.
Colour separation may also reduce accidental pigment contamination between projects.
Helix-Style Mixing Head
The spiral or helix-shaped paddle is designed to move resin and hardener through the mixing cup more efficiently than a plain straight stick.
Comparable helix resin paddles use this shape to improve material circulation and help create a more consistent mixture when operated at an appropriate speed.
Compatible With Most Drills
The product is marketed as working with most drills. Buyers should still check the paddle shaft and their drill chuck before ordering.
A drill with controllable variable speed is preferable for resin work.
Multipurpose Application
The mixer is not limited to epoxy resin. It can also be considered for:
- Paint mixing
- Ceramic glaze
- Silicone
- Resin pigments
- Stains
- Craft liquids
- Other compatible coatings
Reusable Design
The paddles can be reused when they are cleaned promptly according to the material manufacturer’s instructions.
Cured resin can be difficult or impossible to remove, so the attachment should be wiped and cleaned before the remaining resin fully hardens.
Reduced Manual Stirring
Using a drill attachment can reduce repetitive hand and wrist movement, particularly when preparing medium-sized batches.
Compact and Easy to Store
The slim paddle attachments require less storage space than a complete automatic resin-mixing machine.
6. Main Customer Benefits
Budget-Friendly Mixing Solution
The Serplex set is considerably simpler than a dedicated rechargeable resin mixer. It makes use of a drill the customer may already own.
Useful for Regular Resin Makers
It may save effort for people frequently producing:
- Resin coasters
- Decorative trays
- Bookmarks
- Keychains
- Moulded décor
- Resin artwork
- Pigmented resin batches
Helps Create a More Consistent Mixture
The rotating paddle can circulate resin and hardener more continuously than irregular manual stirring.
The user must still scrape the sides and bottom of the cup because no rotating paddle can guarantee that all material around the edges has been incorporated.
Four Paddles Offer Better Workflow
Multiple paddles allow users to reserve different colours for different materials or projects.
For example:
- White for clear resin
- Black for dark pigments
- Red for paint
- Blue for silicone or glaze
Broader Appeal Beyond Resin Art
Because the product can be used with paint, ceramic glaze and other compatible liquids, it can appeal to resin artists, painters, DIY users and workshop hobbyists.
7. What Is Included?
The package shown contains:
- 1 black helix mixer attachment
- 1 white helix mixer attachment
- 1 red helix mixer attachment
- 1 blue helix mixer attachment
Not included
- Electric drill
- Cordless drill
- Resin
- Hardener
- Mixing cup
- Measuring cup
- Gloves
- Pigments
- Silicone moulds
Add a visible note near the Buy button:
Please note: This package contains mixer attachments only. The drill shown in product imagery is not included.
8. Suitable Resin Projects
This tool is best positioned for:
- Coaster resin batches
- Small and medium trays
- Multiple keychains prepared together
- Bookmark batches
- Decorative silicone moulds
- Mica-powder mixing
- Pigmented epoxy resin
- Resin coating mixtures
- Craft and mixed-media projects
It may be unnecessary for extremely small batches used for one pendant or one pair of earrings. A hand stirrer or compact low-speed resin mixer may provide better control for tiny quantities.
9. How to Use the Serplex Resin Mixer
Step 1: Check Drill Compatibility
Open the drill chuck and confirm that it can securely hold the attachment shaft.
Do not use an attachment that remains loose or uneven after tightening.
Step 2: Measure the Resin Correctly
Measure the resin and hardener according to the exact ratio stated by the resin manufacturer.
The mixer cannot correct an inaccurate resin-to-hardener ratio.
Step 3: Use a Suitable Mixing Cup
Select a cup that is:
- Large enough to contain the resin safely
- Stable on the work surface
- Compatible with epoxy resin
- Deep enough to keep the paddle submerged
Do not fill the cup close to the top.
Step 4: Insert the Paddle Before Starting
Place the helix head into the resin mixture before switching on the drill.
This reduces the risk of splashing.
Step 5: Start at the Lowest Speed
Operate the drill at its lowest practical speed.
Fast spinning may:
- Pull excess air into the resin
- Create additional bubbles
- Splash resin outside the cup
- Heat the mixture
- Shorten the working time
Step 6: Keep the Mixer Submerged
Keep the helix portion below the liquid surface while mixing.
Avoid lifting a rotating paddle above the resin because it can introduce air and throw uncured resin around the work area.
Step 7: Move Slowly Around the Cup
Guide the paddle slowly through different areas of the cup without touching the sides forcefully.
Step 8: Scrape the Cup Manually
Stop the drill and use a suitable hand stirrer to scrape:
- The bottom of the cup
- The inner sides
- The corners
- The mixing paddle
Continue mixing only as long as required by the resin manufacturer.
Step 9: Clean Promptly
Remove uncured material before it hardens. Follow the resin or paint manufacturer’s cleanup instructions.
Never clean resin-contaminated equipment in a kitchen sink or where uncured resin could enter household wastewater.
10. Important Usage Guidance
Use a Variable-Speed Drill
A drill that immediately starts at high speed is not ideal for resin mixing.
The user should be able to begin slowly and maintain controlled rotation.
Do Not Chase “Bubble-Free” Claims
A helix mixer may help avoid unnecessary air when used slowly, but it cannot guarantee bubble-free resin.
Bubble formation also depends on:
- Resin viscosity
- Resin temperature
- Mixing speed
- Mixing time
- Pigment quantity
- Moisture
- Pouring method
- Mould shape
Do Not Mix Tiny Quantities at High Speed
For very small jewellery batches, the paddle may be too large or powerful.
Never Hold the Cup With Bare Hands
The cup should be stabilised safely. The user should not place fingers close to the rotating paddle.
Stop the Drill Before Lifting the Paddle
Switch off the drill and allow the attachment to stop rotating before removing it from the liquid.
11. Advantages
- Affordable alternative to an automatic mixer
- Four attachments included
- Different colours help organise materials
- Useful for resin, paint, glaze and silicone
- Reduces repetitive manual stirring
- Compact and easy to store
- Uses an existing compatible drill
- Suitable for medium resin batches
- Reusable when cleaned promptly
- Useful for pigments and mica powders
12. Considerations Before Buying
- A drill is not included
- Drill compatibility should be checked
- High-speed mixing can create bubbles
- Less suitable for tiny jewellery batches
- The sides and bottom of the cup still require scraping
- Plastic paddles may not suit extremely thick construction materials
- Cleaning must take place before resin cures
- The supplied screenshot does not show an established customer-review history
- It is not a hands-free mixing system
- It requires careful control to prevent splashing
13. Who Should Buy It?
The Serplex mixer is suitable for:
- Resin artists who already own a drill
- Beginner and intermediate crafters
- Coaster and tray makers
- Users mixing coloured resin batches
- DIY painters
- Ceramic-glaze users
- Makers who want a low-cost mixing aid
- People experiencing fatigue from manual stirring
It may not be the best choice for:
- Buyers without a drill
- Users who want hands-free operation
- Very small jewellery-resin batches
- Children or unsupervised beginners
- People using a drill without speed control
- Large construction-scale mixing tasks
Recommended FAQ Section
Does the Serplex resin mixer include a drill?
No. The package contains four mixer attachments only. A compatible drill must be purchased or supplied separately.
How many mixer paddles are included?
The listing shows four helix mixer attachments in black, white, red and blue.
Can it mix epoxy resin and hardener?
Yes. The listing markets the attachments for mixing epoxy resin and other liquids. The drill should be operated slowly to avoid introducing unnecessary air.
Will it fit every drill?
The product is described as working with most drills, but buyers should check their drill chuck and the attachment shaft before purchasing.
Does it remove all bubbles from resin?
No. It may help mix resin efficiently when operated slowly, but no mixer can guarantee a completely bubble-free result.
Is it suitable for resin jewellery?
It can be used for preparing resin, but it may be oversized for extremely small pendant or earring batches. It is better suited to medium batches or several small projects prepared together.
Can each colour be used for a different material?
Yes. Users may reserve individual paddles for clear resin, dark pigments, paint or other compatible materials to reduce colour contamination.
Can the paddles be reused?
They are intended as reusable attachments. Clean them promptly before the remaining resin or paint hardens.
Should the drill be used at full speed?
No. Begin at the lowest practical speed. High-speed mixing can introduce bubbles, splash resin and increase heat.
Is it a hands-free resin mixer?
No. The drill must be held and controlled throughout the mixing process.
Key Features
Four Colour-Coded Mixer Attachments
The package contains four paddles in different colours. This can help users keep separate paddles for clear resin, dark pigments, bright colours, paint or other materials.
Colour separation may also reduce accidental pigment contamination between projects.
Helix-Style Mixing Head
The spiral or helix-shaped paddle is designed to move resin and hardener through the mixing cup more efficiently than a plain straight stick.
Comparable helix resin paddles use this shape to improve material circulation and help create a more consistent mixture when operated at an appropriate speed.
Compatible With Most Drills
The product is marketed as working with most drills. Buyers should still check the paddle shaft and their drill chuck before ordering.
A drill with controllable variable speed is preferable for resin work.
Multipurpose Application
The mixer is not limited to epoxy resin. It can also be considered for:
Paint mixing
Ceramic glaze
Silicone
Resin pigments
Stains
Craft liquids
Other compatible coatings
Reusable Design
The paddles can be reused when they are cleaned promptly according to the material manufacturer’s instructions.
Cured resin can be difficult or impossible to remove, so the attachment should be wiped and cleaned before the remaining resin fully hardens.
Reduced Manual Stirring
Using a drill attachment can reduce repetitive hand and wrist movement, particularly when preparing medium-sized batches.
Compact and Easy to Store
The slim paddle attachments require less storage space than a complete automatic resin-mixing machine.
Practical Benefits
Budget-Friendly Mixing Solution
The Serplex set is considerably simpler than a dedicated rechargeable resin mixer. It makes use of a drill the customer may already own.
Useful for Regular Resin Makers
It may save effort for people frequently producing:
Resin coasters
Decorative trays
Bookmarks
Keychains
Moulded décor
Resin artwork
Pigmented resin batches
Helps Create a More Consistent Mixture
The rotating paddle can circulate resin and hardener more continuously than irregular manual stirring.
The user must still scrape the sides and bottom of the cup because no rotating paddle can guarantee that all material around the edges has been incorporated.
Four Paddles Offer Better Workflow
Multiple paddles allow users to reserve different colours for different materials or projects.
For example:
White for clear resin
Black for dark pigments
Red for paint
Blue for silicone or glaze
Broader Appeal Beyond Resin Art
Because the product can be used with paint, ceramic glaze and other compatible liquids, it can appeal to resin artists, painters, DIY users and workshop hobbyists.
Product Details
Step 1: Check Drill Compatibility
Open the drill chuck and confirm that it can securely hold the attachment shaft.
Do not use an attachment that remains loose or uneven after tightening.
Step 2: Measure the Resin Correctly
Measure the resin and hardener according to the exact ratio stated by the resin manufacturer.
The mixer cannot correct an inaccurate resin-to-hardener ratio.
Step 3: Use a Suitable Mixing Cup
Select a cup that is:
Large enough to contain the resin safely
Stable on the work surface
Compatible with epoxy resin
Deep enough to keep the paddle submerged
Do not fill the cup close to the top.
Step 4: Insert the Paddle Before Starting
Place the helix head into the resin mixture before switching on the drill.
This reduces the risk of splashing.
Step 5: Start at the Lowest Speed
Operate the drill at its lowest practical speed.
Fast spinning may:
Pull excess air into the resin
Create additional bubbles
Splash resin outside the cup
Heat the mixture
Shorten the working time
Step 6: Keep the Mixer Submerged
Keep the helix portion below the liquid surface while mixing.
Avoid lifting a rotating paddle above the resin because it can introduce air and throw uncured resin around the work area.
Step 7: Move Slowly Around the Cup
Guide the paddle slowly through different areas of the cup without touching the sides forcefully.
Step 8: Scrape the Cup Manually
Stop the drill and use a suitable hand stirrer to scrape:
The bottom of the cup
The inner sides
The corners
The mixing paddle
Continue mixing only as long as required by the resin manufacturer.
Step 9: Clean Promptly
Remove uncured material before it hardens. Follow the resin or paint manufacturer’s cleanup instructions.